03.Testbench
03.Testbench
1.Verilog 中的 测试 testing
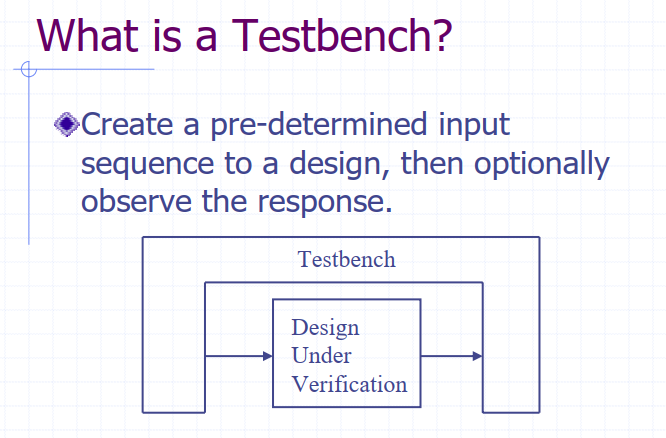
0. 架构

- 激励(Stimulus block): 为 FPGA设计生成的输入
- 输出校验(output checker):检查被测模块的输出是否符合预期
- 被测模块(design under test,DUT) 即编写的verilog模块 ,testbench的主要设计目的就是对其进行验证,以确保在特定输入下,其输出均与预期一致
1. 例化被测模块
module <module_name> ();
    //在这里写testbench
endmodule : <module_name>
<module_name> # (
//例化参数
.<parameter_name> (<parameter_value>)
)
<instance_name> (
//连接端口信号
.<port_name> (<signal_name>),
.<port_name> (<signal_name>)
);2. 建模时间
`timescale <unit_time> / <resolution>

// unit_time 单位时间
// resolution 时间精度
//<resolution> 很重要,因为设计人员可以使用小数来指定 verilog 代码中的延时。
// 例如,如果设计人员想要 10.5ns 的延迟,就可以简单地写为 #10.5。
// 因此,编译指令中的 <resolution> 决定了可以实现最小时间的步长(即精度)。
3.初始块 (initial block)
在initial 块中编写的任何代码都会在仿真开始时执行一次且仅执行一次
4. 循环 (Loop)
至少有一种情况是可以使用无限循环的----时钟信号。为此需要一种定期连续反转信号的方法,foever循环与此相当契合
initial begin
   clk = 1'b0;
   forever begin
     #1 clk = ~clk;
   end
end
5. Veriilog 系统任务(System Tasks)
$display
//一般语法
$display(<string_to_display>, <variables_to_display);

//例子:分别用2进制、16进制和10进制来打印x的值
$display("x (bin) = %b, x (hex) = %h, x (decimal) = %d", x, x, x);
$monitor
一般被用来监视testbench的信号值,这些信号中的任何一个改变状态,都会在终端打印一条消息
//一般语法
$monitor(<message_to_display>, <variables_to_display>);

//例子:监控信号in_a和in_b的值。其中任何一个发生变化都会立即在终端打印出两个信号的值
$monitor("in_a=%b, in_b=%b\n", in_a, in_b);
$time
可以用来获取当前的仿真时间
$display("Current simulation time = %t", $time); //打印当前仿真时间
2. 验证,有别于测试
https://www.scribd.com/document/496328224/WritingTestbench-chap1-3
2.1 验证是什么?
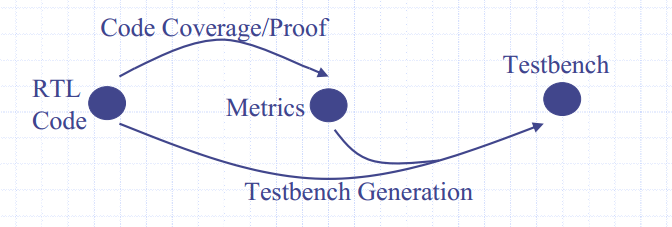
- Testbench Generation
Generate testbenches to either increase code coverage or to exercise the design to violate a property.
- Test VS Verification
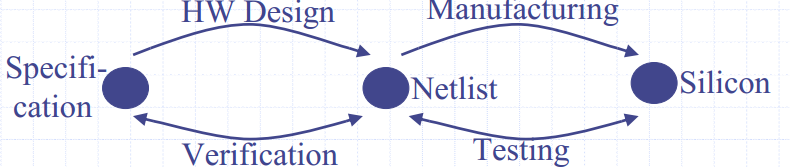
- Testing : Verify that the design was manufactured correctly
- Verification : Ensure that a design meets its functional intent
Verification and Design reuse
- Engineers do not trust that the other design is as good as reliable as one designed by themselves.
- Proper functional verification demonstrates trustworthiness of a design.
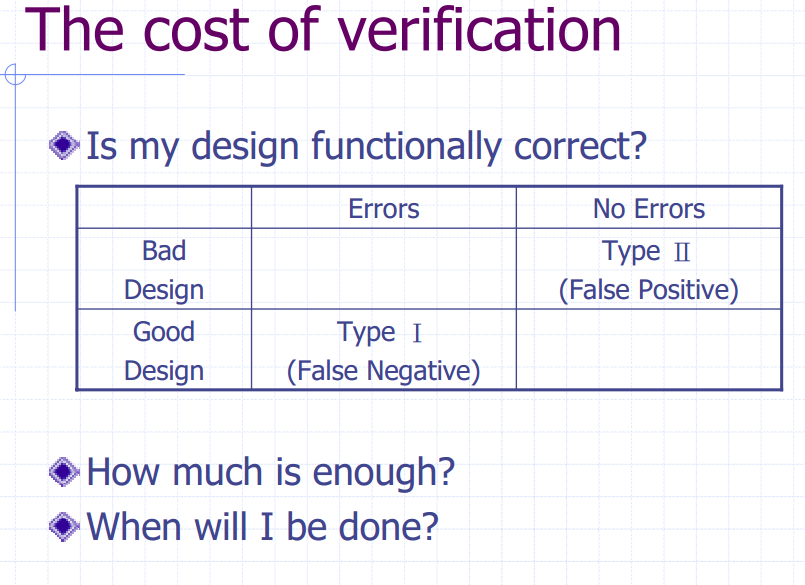
验证的代价
2.2 验证工具
2.2.1 Linting Tools
https://www.shdsd.com/news-627/index.html
Linting是一种自动检查源代码中是否存在编程和样式错误的方法,通常通过使用Lint工具(也称为Linter)来实现。Lint工具是一种基础的静态代码分析器。
以下是Linting工具通常嵌入到开发过程中的步骤:
- 写代码
- 编译代码
- 使用Lint工具进行代码分析
- 查看工具识别出的bug
- 修改代码以解决bug
- 一旦代码干净,就会链接模块
- 用Linter工具进行分析
- 进行手动代码审查
Lint编程是一种自动的检查,它应该在开发的早期——即代码审查和测试之前进行。这是因为自动代码检查能提高代码审查和测试过程的效率。它们还能让开发人员专注于正确的事情。
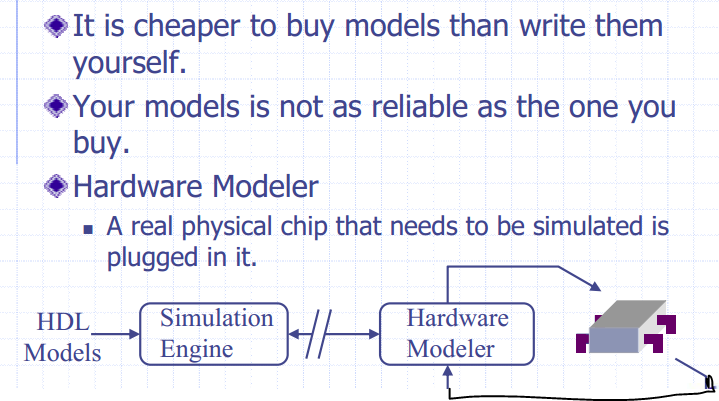
2.2.2 Simulators
对真实的模拟与近似
动态分析,需要激励
The simulation outputs are validated externally, against design intent
联合仿真
- Event-driven simulation
- Cycle-driven simulation(同步电路)
2.2.3 第三方模块
2.2.4 波形观察

- 显示实时信号变化
- 用于Debug Simulations
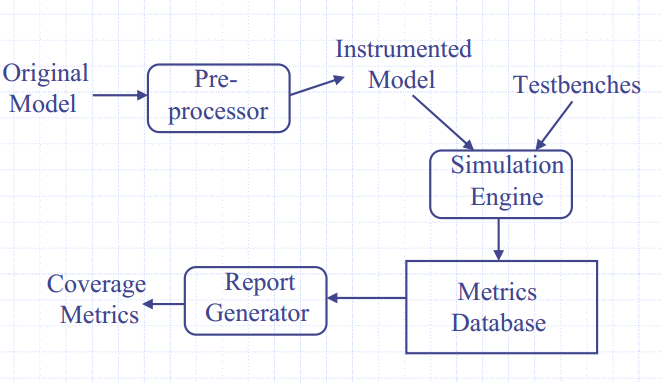
2.2.5 代码覆盖(Code coverage)
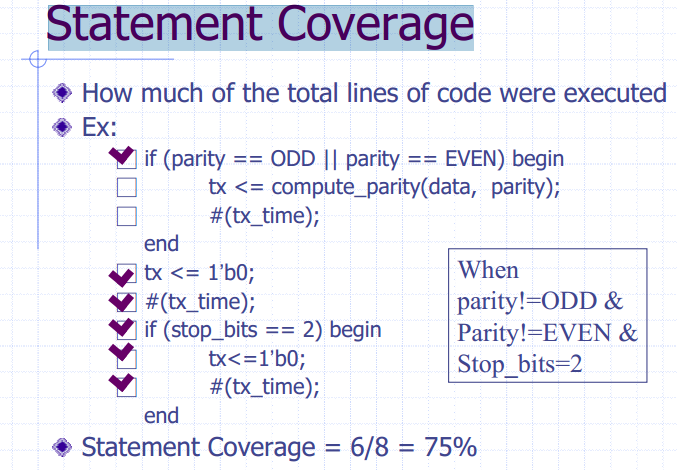
2.2.6 语句覆盖(Statement Coverage)
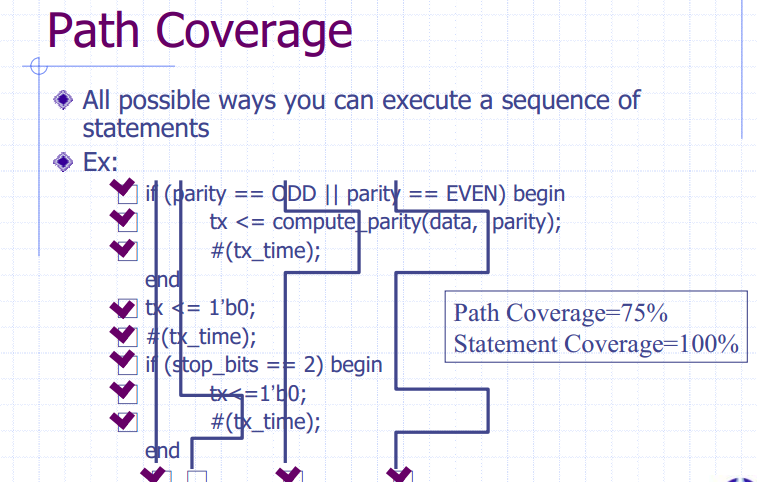
2.2.7 路径覆盖(Path Coverage)
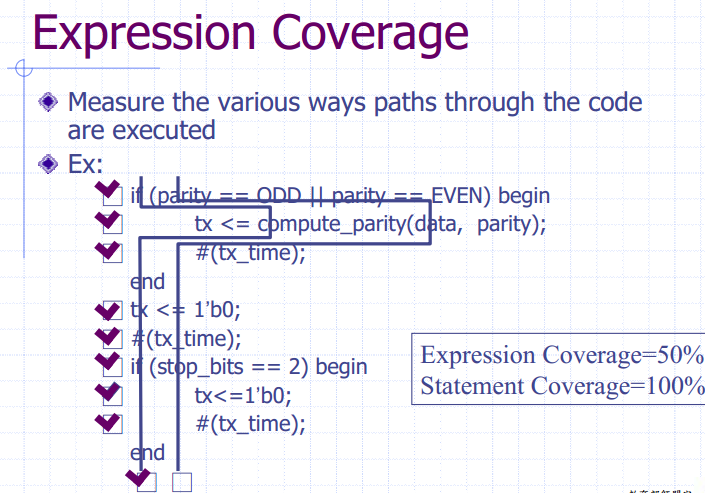
2.2.8 表达覆盖(Expression Coverage)
2.2.9 覆盖率 100%的表示?
Completeness does not imply correctness
Code coverage lets you know if you are not done
(代码覆盖率告诉什么功能还没做)
3. 验证语言
4. 版本控制 (Revision Control)
- Source Control Management Systems
- Configuration Management
- ......
5. 问题追踪(Issue Tracking)
5.1 Issues
核心: 什么样的 问题 值得 追踪?
- Bugs
- Ambiguities(歧义) or incompleteness(不完整) in the spec(规范)
- Architectural decisions and trade-offs
- Errors
- New relevant testcases(新的相关测试用例)
6.度量指标(Metrics)
6.1 目的和作用
- 必要的管理工具
- 可从时间中观察到趋势
- Historical data should be used to create a baseline
- Can help assess the verification effort
6.2 分类
- Code-Related Metrics
- 代码覆盖率
- 代码行数
- Ratio of lines of code
- Source code changes
- Quality-Related Metrics
- Number of known outstanding issues
- Number of bugs found during its service life(使用寿命以内)
7. 验证计划
7.1 角色
Specifying the verification
- Schedule
- The verification plan is the specification document for the verification effort
Defining first-time success
Ensure all essential features are appropriately verified
确保所有基本特性都得到了适当的验证
7.2 验证层级
- Unit-Level Verification
- Reuseable Components Verification
- ASIC and FPGA Verification
- System-Level Verification
- Board-Level Verification
7.3 验证策略
Decide
Type of testcases (White-box or Black-box)
Black-box:Without any knowledge of the actual implementation of a desig
White-box:Has full visibility and controllability of the internal structure and implementation of the design being verified
Grey-box : Controls and observes a design entirely through its top-level interface
is a combination of white-box testing and black-box testing
Level of abstraction (Cycle level or Device driver level)
Verifying the response
- How to check the response
Random Verification
- System-level verification
- Create unexpected conditions or hit corner cases
7.4 From Specification to Features
7.5 From Features to Testcases
Prioritize
- must-have
- must-have
- nice-to-have
Group into testcases Features should be grouped together and assigned to the same verification engineer.
Design for verification
Modify the design to aid verification
7.6 From Testcases to Testbenches
Group into testbenches
Each group of testcases is divided into testbench
Verify testbenches